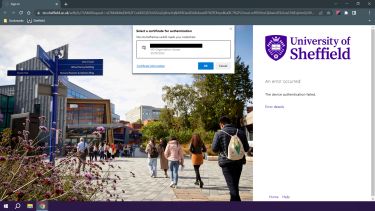
Device authentication errors when logging in
If you encounter a device authentication error when logging into a University system or service using the sts.sheffield.ac.uk method, this guidance will help you resolve it.

Issue overview
Device authentication errors may occur when signing into services that use our sts.sheffield.ac.uk authentication method. This includes access to software such as Office 365 and Adobe Creative Cloud.
When logging into a University service you may encounter a device authentication error, or be asked to choose a ‘certificate for authentication’ and then receive a device authentication error after selecting it.
Resolution
If you are not confident carrying out these instructions yourself, visit the Computing Centre, 8-20 Hounsfield Road, for in-person support.
Workaround
You may be able to work around the issue, particularly if you are a prospective student or non-University member.
- When asked to choose a certificate, click on Cancel
- You may then be prompted for your University username and password
Alternatively, if you are accessing the service through a web browser, try using a Private or Incognito browsing window.
Instructions for fixing the issue
The problem is caused by your Windows account on your computer having a fault with the connection to your University account or being linked to an old Microsoft account (such as one provided by a previous institution or employer) that you no longer have access to. It may also be that you have been asked to collaborate with an external organisation and have inadvertently joined their environment.
You need to check if this connection has occurred, and disconnect the accounts. To fully investigate this issue and check for a resolution you should follow the steps listed below.
Important - if you are using a University Desktop or YoYo computer, do not attempt to disconnect from SHEFUNIAD AD domain. This would stop your computer working correctly and leave it unsecure.
- From the Start menu, click on Settings
- Click on the Accounts section
- Click on Access Work or School on the left-hand side of the window
- Click on the Workplace or School account for your University account or from a previous institution or employer account you no longer have access to
- If you still need the account provided by another institution on a personally owned device, do not proceed any further. Contact IT Services help and support for assistance
- If you don’t see any Workplace or School accounts from a previous institution or employer listed, complete the Diagnostics instructions below, then contact IT Services help and support for assistance
- If you are on a University Desktop or YoYo device, do not attempt to disconnect from SHEFUNIAD AD domain. This would stop your computer working correctly and leave it unsecure.
- With the Workplace or School account for your University account or from a previous institution or employer account you no longer have access to selected, click Disconnect.
- You will be asked to confirm you want to do this. As the University uses Google for email and apps you won’t lose access to these.
- Close any web browsers and other software you have open, ensuring you save your work
- Restart your computer
- Try to log in again
If you are signing into services such as Office 365, when prompted uncheck the box for Allow my organisation to manage my device, then select No, sign into this app only.
If you continue to experience problems, follow steps 1 to 4 again to confirm the account was disconnected successfully. If not, repeat the remaining steps.
If you are still experiencing the issue, complete the Diagnostics instructions below, then contact IT Services help and support for assistance.
Diagnostics instructions
These instructions will allow you to collect detailed information about your device setup to allow IT Services help and support to assist you.
- Open the Start menu, then find Windows PowerShell in the list of software.
- The software itself may be in a folder also called Windows PowerShell
- Click to open Windows PowerShell
- Type or copy in the command below into Windows PowerShell, then press the Enter button
- dsregcmd /status
- Click the right mouse button on the title bar at the top of the screen, then choose Edit, then Select All
- Click the right mouse button on the title bar again, then choose Edit, then Copy
- The detailed information about your device is now copied to your clipboard. You can paste it into the Full Description of Issue section when completing the IT Support Request Form by right clicking into the box, or by holding down the Ctrl key and pressing V
